Being a big fan of fantasy novels, I've always had an interest in how characters within books with massive character lists all interweave and connect together. I've also had interest for awhile now in visualizing some type of complex network with networkX in Python. Oathbringer is the most recent book from Brandon Sanderson's Stormlight Archive series and it was a perfect option for me to combine both of these interests. The following is the code I used to parse through the etext of the novel and create a character co-occurence network diagram. Although certain decisions made throughout the process may not be perfect for representing direct 'co-occurrences', I found the resulting visual to be an interesting look at relationships seen throughout the book.
#Created by Andy Trick
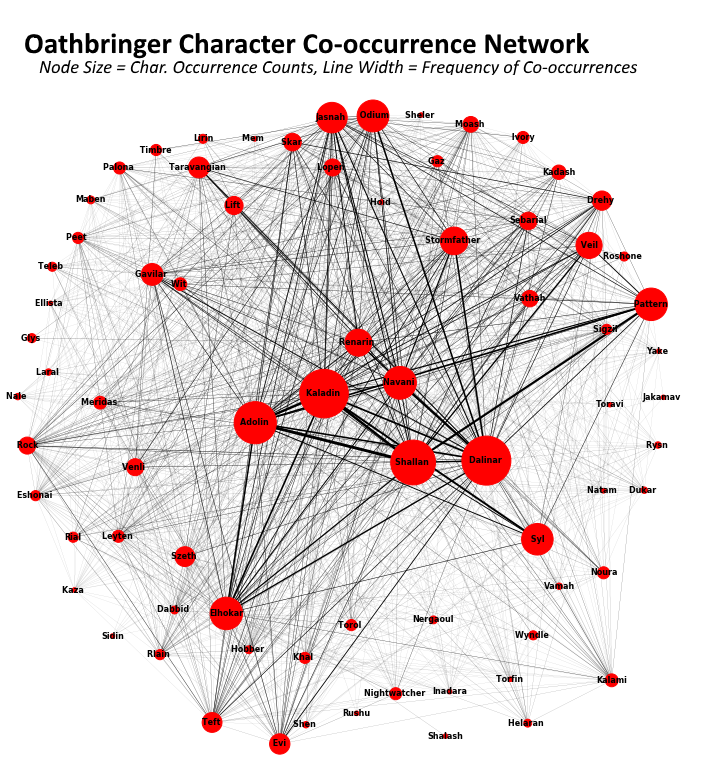
Before we get to the code, I thought I'd post the final resulting image here. This is the final version I was able to achieve with only some minor nlp with regex and formulating the text into a matrix to work with the networkX package.
 Now, onto the code!
import re
import pandas as pd
import networkx as nx
import matplotlib.pyplot as plt
Networkx works off of matplotlib, so both imports were required above. Additionally, I end up using a bit of regex to filter some text and use pandas to create the original co-occurrence matrix that helped formulate the network.
So with that, the first step was to import the data in .txt format. This is a direct text file from the ebook.
with open('../data/oathbringer.txt') as text:
    book_text = text.read()
Simple enough to read the text file in. I next use the asterisks to split the text document up into a list of text blocks. I additionally use '-From' to break it apart as well. Each of these indicate either a new chapter or a new Point of view within the book.
This was one of the major decision points for this project- How to indicate a 'co-occurrence'. I opted for counting a co-occurrence as any time someone is in the same POV as another person.. While using some nlp and n-gram length checks could have been a more accurate method to figuring 'co-occurrences', I worried it would be too inaccurate. As such, I chose this method that errs towards inclusion.
#split at pov changes
book_text = book_text.replace('—From', ' * * * ')
sections = book_text.split('* * *')
I next remove all dialogue from the text.. this was pretty simple to do with regex and allowed me to not include characters as a co-occurrence on the chance that it was two people talking about a third who was not within the scene.
#remove all dialogue
cleaned_sections = []

for section in sections:
    quotes = re.findall("“.*?”", section)
    for quote in quotes:
        section = section.replace(quote, " ")
    cleaned_sections.append(section)
I manually created a list of all the 'important' characters in the book. Basically I went through the wiki page and included anyone of interest.
#Create characters list and cooccurnce matrix
characters = [' Syl ', ' Pattern ', 'Wyndle ', 'Glys ', ' Ivory ', ' Timbre ', 'Stormfather ',
              'Nightwatcher ', 'Dalinar ', 'Shallan ', 'Kaladin ', 'Venli ', 'Adolin ',
              'Szeth ', 'Navani ', 'Moash ', 'Jasnah ', 'Teft ', 'Renarin ', 'Lift ',
              'Taravangian ', 'Wit ', 'Eshonai ', ' Rock ', 'Lopen ', 'Rysn ', 'Sigzil ',
              'palona ', 'mem ', 'ellista ', 'kaza ', 'gawx ', 'sheler ', 'rlain ',
              'torol ', 'meridas ', 'teleb ', 'gavilar ', 'resi ', 'elit ', 'erraniv ',
              'helaran ', 'jakamav ', 'kalishor ', 'salinor ', 'tanalor ', 'tinalar ',
              'skar ', 'dabbid ', 'hobber ', 'shen ', 'leyten ',
              'drehy ', 'gadol ', 'natam ', 'peet ', 'torfin ', 'yake ', 'baxil ',
              'roshone ', 'tavinar ', 'istow ', 'dukar ', 'gavinor ', 'gaz ', 'ghenna ',
              'hoid ', 'inadara', 'isasik', 'ishikk', 'jenet', 'kadash', 'kalami',
              'khal ', 'khriss', 'laral ', 'lhan ', 'lirin', 'maben',
              'maib ', 'marri ', 'mik ', 'nale ', 'nazh', 'nergaoul', 'nbissiquan',
              'nlent', 'noura', ' odium', 'redin', 'rez ', 'rial', 'rushu',
              'sebarial', 'shalash', 'sidin', 'sja-anat', 'tag ', 'taka ',
              'talik', 'temoo', 'thresh ', 'tigzikk', 'toravi', 'vamah',
              'vao', 'vath ', 'vathah', ' veil ', 'elhokar', ' evi ',
              'evinor']
characters = [character.title() for character in characters] #oops title case
I created a dictionary of POV section : characters within. This is used shortly after in creating the co-occurrence matrix.
#--> iterate through each and store in dictionary
sections_dictionary = {}
iterative = 0
for section in cleaned_sections:
    iterative += 1
    for char in characters:
        if char in section:
            if str(iterative) in sections_dictionary.keys():
                sections_dictionary[str(iterative)].append(char)
            else:
                sections_dictionary[str(iterative)] = [char]
Using this, I create the matrix discussed above.. It's more or less a sparse co-occurrence matrix. Each row/col relates to a character, where they line up is their co-occurrence count.
##set base df (co-occurance matrix)
df = pd.DataFrame(columns = characters, index = characters)
df[:] = int(0)

#iterate through each POV of book and add one for each character-character relationship
#-> in this case, relationship equates to appearing in the same POV
for value in sections_dictionary.values():
    for character1 in characters:
        for character2 in characters:
            if character1 in value and character2 in value:
                df[character1][character2] += 1
                df[character2][character1] += 1
Using this matrix, I am able to create two lists- One for the edges for the diagram represented in a tuple of form: (char1, char2, co-occurrence weight). I decided to make each weight a decimal in relation to the max occurrence seen: Which was Dalinar's count at 464.
I also create the node list below by, more or less, the same method. This is a duple though containing: (char, total occurrences).
#add weights to edges
edge_list = [] #test networkx
for index, row in df.iterrows():
    i = 0
    for col in row:
        weight = float(col)/464
        edge_list.append((index, df.columns[i], weight))
        i += 1

#Remove edge if 0.0
updated_edge_list = [x for x in edge_list if not x[2] == 0.0]

#create duple of char, occurance in novel
node_list = []
for i in characters:
    for e in updated_edge_list:
        if i == e[0] and i == e[1]:
           node_list.append((i, e[2]*6))
for i in node_list:
    if i[1] == 0.0:
        node_list.remove(i)

#remove self references
for i in updated_edge_list:
    if i[0] == i[1]:
        updated_edge_list.remove(i)
All that was left was to start the networkX work. I begin by setting the plot size. Continuing I iterate through the node_list and add each one to the graph. I then do the same for the edges, specifying the Char-Char relationship, including the line weight.
I quickly ran into trouble here and learned that, to set a unique node size and edge weight for each unique point, I had to also have a size_list and width_list, respectively. I end up calling these in the draw phase.
The main take-away: I had to manually print out the order of the nodes, then create a list in this order of their appropriate node sizes. Again so for the edges.
#set canvas size
plt.subplots(figsize=(14,14))

#networkx graph time!
G = nx.Graph()
for i in sorted(node_list):
    G.add_node(i[0], size = i[1])
G.add_weighted_edges_from(updated_edge_list)

#check data of graphs
#G.nodes(data=True)
#G.edges(data = True)

#manually copy and pasted the node order using 'nx.nodes(G)'
#Couldn't determine another route to listing out the order of nodes for future work
node_order = ['Skar ', ' Syl ', 'Rushu', 'Kaza ', 'Peet ', 'Roshone ', 'Dabbid ',
              'Toravi', 'Natam ', 'Adolin ', 'Shallan ', 'Navani ', 'Nightwatcher ',
              'Gavilar ', 'Rlain ', ' Odium', 'Khal ', 'Ellista ', 'Lirin', 'Leyten ',
              'Laral ', 'Torol ', 'Shalash', 'Inadara', 'Sigzil ', 'Elhokar', 'Venli ',
              'Sidin', 'Wyndle ', 'Rysn ', 'Mem ', 'Palona ', 'Wit ', 'Vamah', 'Eshonai ',
              'Lift ', 'Stormfather ', ' Evi ', 'Moash ', 'Shen ', 'Kaladin ', 'Lopen ',
              'Szeth ', 'Renarin ', 'Taravangian ', 'Kadash', 'Nale ', 'Drehy ', 'Dukar ',
              'Gaz ', 'Teleb ', 'Helaran ', 'Sheler ', 'Sebarial', 'Hoid ', 'Meridas ',
              ' Pattern ', ' Timbre ', 'Kalami', 'Glys ', 'Yake ', ' Veil ', 'Nergaoul',
              'Noura', 'Hobber ', ' Ivory ', 'Maben', 'Torfin ', 'Rial', 'Teft ', 'Dalinar ',
              'Vathah', 'Jakamav ', 'Jasnah ', ' Rock ']

#reorder node list
updated_node_order = []
for i in node_order:
    for x in node_list:
        if x[0] == i:
            updated_node_order.append(x)

#reorder edge list - this was a pain
test = nx.get_edge_attributes(G, 'weight')
updated_again_edges = []
for i in nx.edges(G):
    for x in test.iterkeys():
        if i[0] == x[0] and i[1] == x[1]:
            updated_again_edges.append(test[x])
With the sizes and edges in correct order, all that was left was to draw out the graph. This step required a lot of trial and error. The original sizes and weights were wayyyy too small, so I added scalars to explore possibilities with. The values below were the result of the trial runs.
Similarly, The default graph was inappropriate for such a large network. I played around with the splring_layout(K, iterations) params to find a happy-medium between edge distance and iterations of graphing. These two values below result (typically) in a nice looking network. It's randomized so the visual will display a different version each time it is ran. The nodes and edge sizes remain the same, yet the locations of the nodes within the graph will be randomly placed.
#drawing custimization
node_scalar = 800
edge_scalar = 10
sizes = [x[1]*node_scalar for x in updated_node_order]
widths = [x*edge_scalar for x in updated_again_edges]

#draw the graph
pos = nx.spring_layout(G, k=0.42, iterations=17)

nx.draw(G, pos, with_labels=True, font_size = 8, font_weight = 'bold',
        node_size = sizes, width = widths)

#plt.axis('off')
#plt.savefig("imgs/sl_network2.png") # save as png
Overall, I'm very excited about how this turned out! I got some great experience creating network diagrams with a fun python package, and was able to visualize how the characters within Oathbringer connect.
The final visual posted above is the result of this code combined with some title creation in Paint.net.